ThisChurch: Church Websites
Software Manual
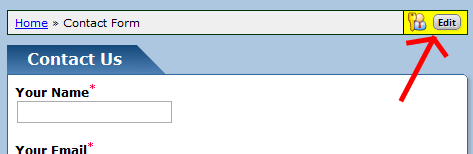
Contact Human Support?
You can reach us anytime with your questions by email at [email protected].
Our philosophy is simple: Customer support is our #1 priority. We don't let your questions sit around in a queue. When you ask a question, we will stop what we're doing to help you. The average response time for a business-day request in the last week is minutes. Frequently Asked Questions
Welcome to ThisChurch! We provide a complete website solution for your church. We are a turnkey website provider, which means that we take care of the basic site design and "guts" of the site, and you only need to provide content.
Let's take a concrete example to illustrate the difference. In the past, if you wanted to add a calendar to your site, you'd need to use HTML to create the calendar for the current month, populate it, and when the next month came along you'd need to go back to the site and do the whole thing over again. This is why most sites who tried this are still stuck in 2002. With us, we've already built an automatic calendar module. You just tell us when your events happen, if and when they repeat, and our software takes care of updating it for you.
With a traditional web host, you need a number of people involved to create and maintain your website:
- A site designer would create the visual aspects of a website.
- A site programmer would write backend applications, such as mailing lists.
- A site hosting company would charge a monthly rate to keep the site online.
- An HTML expert would need to maintain and update the site.
With ThisChurch, we provide you with the complete package. Instead of needing an HTML expert to maintain the site, you can do it yourself regardless of your computer skills. Adding news, information about events, and other unique features is as simple as typing into your word processor.
When you sign up for a trial website, you are given a temporary URL address where you site can be seen. It looks something like this:
http://abcd.thischurch.org/Yours will not be "abcd", but instead something with your initials. It was sent to you in your introductory email, and if you've lost it, just contact us to find out where it is. To get to your site, type this in the "Address" box at the top of your browser.
This address will always stay around for as long as you own your site, however, we recommend purchasing a domain name (such as http://www.abcd.org/) to make your site's name easier to remember. These cost $25/year if you don't already own one. See the "Domain Names" section of the manual for more information.
Your website is updated by you online, through the website itself. However, you obviously don't want anyone in the world to be able to update your website. It is therefore required that you log on to your website as an administrator before you update anything. You may already be logged on as an administrator. You can find the logon link by scrolling all the way to the bottom of your website.

If there's a welcome message and a Logout button instead, you're already logged on. When you signed up for your trial, you received a username and password by email which you can use to update your site. The username is always admin, and the password is unique to your site.
Did you forget what your password is? No problem. Simply click the "Logon" button and choose the Forgot Password link. Enter your email address and your password will be mailed to you. Return to the logon page and you'll be set.
When you see yellow backgrounds, these are administrative controls that only you see. They are the way that you update your website.
The core of the administrative controls is the yellow bar you'll see at the top of your site when logged on as a site administrator. These are drop-down menus that work like the menus of desktop programs. You can access most areas of your site to add and edit content from this bar.
This bar also has a menu called "This Page", which has useful controls specific to the page that you're currently viewing. Depending on what's supported for that page, it allows you to get help, edit, delete, link to, and lockdown the current page.
For page-specific administrative content, you'll often see boxes that look like this:
These boxes are page-specific administration controls, and allow you to perform actions on that page's content. Only administrators will see these boxes. One handy feature in some of these is the idea of a blurb. A blurb is simply a chunk of text you can add to the top of this page.
Often on the site, you'll be able to control lists of items, for instance photos in a gallery, news items, etc. Here are some common buttons that you'll see associated with these
Add This button will add a new item to the list. Edit This button will make changes to an existing item. Delete This button will remove this item. This button will move the item up in the list. This button will move the item down in the list.
You can use and administer your ThisChurch with almost any computer with a web browser and an internet connection. Most any modern browser and operating system will work, including Internet Explorer and Firefox / Mozilla. Officially supported browsers are Google Chrome (Linux, Windows), Firefox 3.6+ (Linux, Windows), along with Internet Explorer 10 and above (Windows only). Safari for the Macintosh are theoretically supported, but we have no way of testing it. We highly recommend using Chrome on any operating system, both for your website and general browsing.
Some popup blockers interfere with parts of our software, so you'll want to disable them or allow popups from our site. Javascript is required, and must be enabled. If using Internet Explorer, you also must have Medium-High (or lower) security enabled (see "Tools" > "Internet Options" > "Security").
Your church information (name, address, phone, etc.) shows up on the front page of your site. You can control what goes here.
- Go to your church's page, logged on as an administrator.
- Choose the "Church Information" item of your site's "Content" menu.
- Update the information in the form.
- You can elect to remove the weather image or the map and directions links from this page.
- The "Front-Page Description" box allows you to add freeform text to the information box on your front page. You can use this for an introduction, for instance.
- You can also upload an image of your church to display on the front page. Simply click the "Browse" button and find the .GIF, .JPG, or .PNG image on your hard drive.
- Click "Save Information" when you have completed. It may take a few seconds to process the update.
Your website has a list of staff members. It's a great place for you to tell your users about your administration family. Each person has their own profile.
To add a staff member:
-
Go to the Staff item of your site's Content menu.
- Click on the Add Staff button at the top of the page.
-
Fill in the entries in the form.
- Name - The name of the staff member.
- Title - What is their title or position?
- Email - Do they have an email address? Add it here if so.
- Username - If they have an account on the website, select the username here.
- About - Tell the world about this person. Be as short or as detailed as you wish.
- Photo - You can also upload a photograph to display on their profile. Simply click the "Browse" button and find the .GIF, .JPG, or .PNG image on your hard drive.
- Add to Linkbar - This will add a link to this staff person in the links at the top of your site. Use this sparingly to avoid a very wide linkbar, or worse, one that spills into multiple lines.
- Click the "Add Staff Member" button. They will now show up at the top of the page. You can repeat the process for as many times as you'd like.
Widgets are at the heart of page customization for your site. They're chunks of content that can be dragged into your pages. On each page, there are several areas where you can drop widgets.
To view available widgets, log on as an administrator, then click on the "Widgets" tab at the top-left corner of your website. A bar will pull out from the side of your site with a list of available options. In this bar, there are four folders, representing different categories of widgets: "Layout", "Content", "Community" and "Files & Media" - clicking on the name will open the group.
To add a widget to your site from this bar, click and drag it while holding your mouse button down. When you start dragging, you'll see the outline of various areas where you can drop the widget on the screen. Drop the widget and an options box will pop up, allowing you to customize the layout.
Moving widgets around is just as easy: open up the widget bar to enable the controls, then just click and drag them around to rearrange.
Widgets need a place to live, and that's what widget boxes are for: they provide a place for you to drop widgets. Once you open the widget sidebar and begin to drag a widget, you'll see the available widget spots where it can be dragged.
Most pages have widget boxes placed at strategic spots. But every page shares two special widget boxes - the global top and bottom. Adding widgets to these boxes allows you to have widgets that span multiple pages (or every page on your site). Note that since they're not as common, global boxes are not available for dropping by default. Click the "Show Global Boxes?" checkbox at the bottom of the widget bar to enable these for dropping.
When dropping a widget, the "Show On" item of the options panel for that widget allows you to control its scope. For instance, adding a widget at the bottom of a news article sidebar will normally show on all articles. Change the "Show On" to "Site News" and it will only show on news articles for that news category. Change to "This Page" and it will only show up on that particular article.
Your front page has a widget box in the middle to create a box-oriented layout. Other pages have specialized widget boxes, such as a news article, which has drop zones in the sidebar, above the discussion area, etc.
Each widget has a number of options which can be configured. You can get to this by hovering your mouse over the widget (normally with the widget bar open) and clicking the "Options" button that shows up in the tab above the widget. By default, you'll also see the options pane automatically when adding a new widget.
Under Layout, you'll see a number of options:
- Show On: Limits the scope of the pages the widget will be shown on. See below for more information.
- Wrap In Box: Depending on where you add the widget, it will either be bare or wrapped in a box, which separates it from other widgets. "No" means there's no box - you can set this to "Yes" to use an attractive box, or "Title Only" to show a simple box.
- Who Can View: Sometimes, you'll want to restrict a widget so that it's only showed to logged-in users. Change this to "Users" to limit who can view it.
- Alignment: Controls the text alignment of the content (left, right, center).
The Padding section allows you to assign space above, below, and to the right and left of the widget.
Below these settings, for some widgets, are additional fields that allow you to give more detail how you'd like to the widget to display.
At the bottom of the widget bar is a "Preferences" button, which allows you to control the following options:
- Always Show Widget Bar: When set to "Yes", the widget bar will automatically open for administrators every pageview. While this could get distracting over time, it's useful when you're actively setting up your pages.
- Allow Widget Dragging: When set to "When Bar is Open" (default), hovering your mouse over a widget will show its controls only when the widget bar is open. Changing this to "Always Allow Dragging" will show them for all administor pageviews.
- When Adding Widget: When set to "Show Options" (default) and you drag a new widget onto your screen, the options panel will show to allow you to make changes to the format. If this becomes distracting, you can switch this to "Don't Show Options", then open them manually when you need them.
Text widgets are the most flexible widgets, because they can contain anything your text editor allows you to do. The easiest way to edit their content is to simply double-click them to edit the content in-place. For more options, hover over and click the "Edit" button in the tab that appears. This allows you to also add additional text options, and the page will cycle through the available options.
Double-clicking most other widgets is a quick way to bring up the options pane.
Available Widgets
The Layout folder of your widget bar contains the following:
- Text: The workhorse widget: allows you to insert text anywhere on your site. And not just text: anything you can edit with your HTML editor! You can double-click the text to edit it. When you hover over a text box with the widget bar open, the Edit button that shows up in the tab allows you to create additional text options, which will cycle in realtime.
- Header: A simple widget that allows you to insert a text header. In the options pane, you can change the header text, the font size, and tell the system to put a box around it.
- Image: Adds an image to your page. Click "Choose File" in the options pane to upload a file. Once added, you can choose alt text, a URL to go to when the image is clicked, and you can resize the image (which works from the original, so you won't lose quality).
- Line: This one's easy - it's just a horizontal separation line.
- Two Columns: Creates two, even, side-by-side widget boxes to split your content into columns.
- Three Columns: Same as above, just three columns.
- Right Sidebar: Similar to two columns, but the right column is narrow, and by default has a box around it to separate it. You can give the sidebar a title and set the width in the options pane.
- Left Sidebar: Same as above, but on the left side.
- Two Sidebars: Same as above, but two sidebars are added.
These widgets mostly contain automatically-generated content from the meaty parts of your site (news, calendar, etc).
- News: Lists out recent news articles. The options pane allows you to choose which news category you're using.
- Photo Gallery: Creates a rotating gallery of photos from one or more of your existing photo galleries. By default, it pulls from all photos on your site, but in the options pane, you can click "Choose Galleries" to select specific ones.
- Calendar: Shows a list of events, and/or a graphical calendar. The options pane allows you to select a calendar, a format, and the number of events.
- Search: A simple search box that finds information on your site.
- Information: A box containing information about your organization.
- Map: Shows a map of a specific location. By default, it's your address, but you can change this from the options pane. You can also set the zoom level.
- Custom Form: Collect information from your users.
- Store: Allows you to sell merchandise or accept donations.
- Links: Create a list of links to other sites, or within your site.
- Counter: Displays the number of hits your website has received.
- Staff: Shows a list of the staff for your organization.
- Weather: Shows a graphic of the weather for your location. The options pane allows you to choose a different city.
- Raw HTML: Anything you want. The code you add will be inserted into the page. This is useful for pasting generated code for feeds and things like Google Analytics.
Here are widgets which deal with user interaction, social media, and accounts.
- Groups: Shows a list of your site's groups.
- Discussion: Allows you to add a discussion area to a page. Note that if you set the scope of this widget across multiple pages, the same discussion threads will show on all of those pages.
- Forum: Creates a new forum. You can also choose an existing forum in the options pane to show that instead.
- Active Topics: Shows which forum topics are currently active.
- New Users: Shows a list of new accounts on your site.
- Logon: For logged-out visitors, shows links to log on or create an account. For logged-in users, shows an account customization link and a logout button.
- Poll: Creates a new category to add polls to.
- Mailing List: Ask your visitors to sign up for your mailing list.
- Chat Wall: Shows the chat wall for your site. Currently only supports the main one.
- Twitter: Creates a box which shows recent Twitter updates for a given user, which can be set from the options pane.
- Facebook Box: Shows a box about your Facebook page.
- Social Sharing: Creates an array of buttons that allows your users to share a link to the current page on social networks.
- Affiliates: Earn money by referring others to ThisChurch.
Here you can share audio and video content, as well as file downloads and more.
- Audio: Choose a file from your Media Manager, and a player will show up on your page.
- Video: Same as above, but for a video file.
- Media List: Shows a list of items in your Media Manager.
- YouTube Video: Imports a video from YouTube directly onto your page. The options pane allows you to choose the display format.
- Flash: Upload a Flash file, which will be automatically embedded into your page.
- File: You can upload any file here, and this widget will show a link to it. Useful for downloadable forms and such.
- File List: Shows a tree of files in your File Manager. The options pane allows you to choose the starting point.
News
The News section is one of the most core features to any website. It's the main place where your updates will happen, and is the most important method of communication with your visitors. To this end, we've done everything we can to make this area as powerful and flexible as possible.
The best feature of the news manager is the ability to assign start and end dates to stories. This means that the news section will always be current because expired news entries will automatically be moved to the archive. You can even post stories with a start date in the future. They will not be shown to the public until the start date arrives, and will be accessible to administrators on the news category's main page (see the "Future Stories" button at the top).
By default, your site will have one global news category, called Site News. Each Group also has its own news category. You can also create additional news categories if you wish. Drop us a line if you need help with this.
Each news article can have a photo gallery associated with it. Click the "Photos" button in the yellow administrative bar to create it and upload photos. All photos added will be shown below the text of the article.
To create a new news article:
- Choose the News item of your Content menu.
- Click on the Add News button at the top of the News Administration page.
-
Fill in the entries in the form.
- Title - The short name describing the news item.
- Summary (optional) - Shows up below the headline on the front page, to give an idea what the story is about.
- URL (optional) - If you want to link directly to another page instead of typing the news in yourself, enter the URL here. Note that this should only be used if you leave the Entry field blank above. Otherwise, type your article in the News Text box.
- News Text (optional) - This is where the actual news story goes. Type in your story, using HTML tags if you wish. When the user clicks a headline, it will bring them to a page showing this. Not used if you use a direct URL link.
- Image Upload (optional) - Create an image icon for this article (GIF, JPG or PNG images supported)
- Short Filename (optional) - Chooses the short address for this article's URL. Typing news_article will set the URL to http://www.example.com/n/news_article.html
- Date Range - Your article will only be featured during these dates. If the start date is in the future, the article won't yet be shown. If the end date is in the past, it will only show up in the archive. Between the start and end date, your article will be featured on the news page and the front page.
- Priority - A number from 0 to 100 (default 50) indicating the priority of the story. The higher the number, the more important.
- Status - "Active" means this post will be public as soon as it's been added. "Pending" means that it will be accessible to administrators only until it's been made public.
- Topics (optional) - Assign topics to this news item. Topics must be created before they are used.
- Click the "Add Entry" button. The entry will now show up between the start and end dates.
Each news category, such as the default Site News can have zero or more topics created within them. For instance, you might choose to add these topics to your Site News, using the "Topics" button from the main news category page:
- Events
- Important Annoucements
- Birthdays
- Miscellaneous
When adding news items, you'll be able to assign a give topic to the article. This will file it under this topic. All articles will still appear together in the main news listing, but it will show a link to the topic next to your article. Clicking this link will show a filtered list of other news artices with this topic.
Global site administrators are able to make changes to all news categories. You can also assign sub-administrators on a per-category basis. This means that a given user will be able to add, update and delete news entries from a given category but will have no extra rights on the rest of the site.
To add a new news sub-administrator:
- Go to the main page of the news category in question.
- Click the "Admins" button at the top of the page.
- Under the "Add Administrator:" box, choose the user you'd like to add.
- Click "Add User".
The process to remove a sub-administrator is the same, except using the "Remove User" link above.
To create a news article with an attachment, first add the news article as usual. Then, when viewing the new news article, click the "Attachments" button in the page's administrative box.
Note that adding an MP3 as an attachment automatically turns the news category's RSS feed into a valid Podcast feed.
Calendar
The calendar software is a central part of your site. All of your events should be added onto this to keep people updated. Much like the news area of your site, you add events with a date, and your site will automatically keep the calendar up to date. After a day has passed, the events for that day are automatically moved into your calendar's archive.
To create a new event on your site's calendar:
- Choose the Calendar item of your administration bar's Content menu.
- Click the "Add Event" button in the left side of the table.
-
Fill in the entries in the form.
- Calendar - Which calendar will this event appear under?
- Name - The short, generic name describing the event, such as "Wednesday Meeting".
- Date- The date of this event (or the first date of the repeating series).
- Repeat - By default, you're adding a one-off, single day event. You can use this setting to create events that will repeat daily, weekly, monthly or yearly.
- Start & End Time (optional) - The time that the event begins and ends.
- Short Description (optional) - The specific description of this event, such as "Event Planning".
- Long Description (optional) - Give the details of the topics that will be discussed. Be as detailed as you wish.
- Click the Save Changes button. The entry will now show up in the calendar.
When creating a repeating event, everything you type here will be repeated for all events, so you'll want to leave most fields blank unless the contents will be relevant for every date in the series. You'll be able to add additional details later.
When viewing an event page, as usual, you can click the "Edit" and "Delete" buttons to make changes and remove calendar events. When editing or deleting a recurring event, you'll be presented with a list of options to determine the scope of the changes you'd like to make. This allows you to make changes to a single event in the series, or to make the change to multiple events.
There are a couple of other ways to make quick changes to the date and time of an event. In a monthly view, you can click and drag events from one day to another to change their day. In a weekly or daily view, you can also click and drag between days, and you can also drag it to a different time within the same day. To change the time in the weekly or daily views, click and drag the top or bottom of the event box.
You can create signup forms for individual events. Click the Signup Form button on the event page to create a form. The default form with a few basic default questions (name, attendance status, and comments). You can add or remove fields from there. Internally, this is a custom form, so you have access to all of the features in this area of the site.
To view the results, you can either go to the Custom Forms item of your site's Features menu and click on the link for that event, or go to the event itself and click the Signup Form button. From that page, you can also subscribe to email notifications when somebody signs up for that event.
Just like in the news section, you can assign calendar administrators who only have rights to the site calendar. See the "Admins" button on the main calendar page.
In addition to the main site calendar, each group that you create will have its own calendar. They work similarly to the site calendar. You can mirror the events from these calendars onto the main site's calendar.
You can add attachments to calendar events, just as you can with news articles. Click the Attachment button when viewing the event to do this. You have the choice of attaching the file to all of the events in a recurring series, or just the chosen date. This is useful for sharing documents relating to the event.
You can also photos to a calendar event. Just click the Photos button to get started.
Appointment Scheduling
 This feature allows you to offer bookable resources, services for those resources, and to allow your users to make appointments directly from your website. You can access this feature from the "Appointments" item of your site's "Features" menu. The interface has four tabs: "Schedule" (a calendar grid of your appointments and availability), "Book Appointment" (to create a new reservation), "Resources" to manage your offered resources, and "Services" to manage the services you offer for those resources.
There are two options available globally for this feature, available from the "Preferences" button on this page. From this page, you can choose to automatically approve incoming appointment requests from users (the default), or require an administrator to approve them first. You can also say whether you want end users to be able to view the schedule grid, the schedule grid and appointment details, or neither (the default).
Resources are people, places or things with whom appointments can be booked. You can add or edit these from the "Resources" tab of the appointment manager. To create a new resource, click the Add Resource button.
When adding or editing a resource, you have the ability to specify a variety of options. Lead Time allows you to only accept bookings a certain amount of time in the future, so you're not surprised with a walk-in who just made the reservation five minutes before. Cancel Lead Time determines how far in advance a user can cancel their appointment. Future Limit controls how far in advance users can book an appointment. All of these limits are ignored for administrators.
A resource has its own time schedule of availability. Click on an existing resource in the left side of the panel, and you'll see its availability grid. This is a repeating weekly schedule. Click and drag your mouse in the grid to create areas of availability. The areas in green are available for booking. Click Save Changes to apply any changes you've made.
For the availability schedule, you can schedule changes for the future. Above the grid, click the Create Future Schedule button. The box will ask the date range - give a start date for the new schedule, and an optional end date (leaving that blank means the change will become the new schedule from that date on). This is useful in a variety of circumstances - if you'll be on vacation for July, you create a new, empty schedule from July 1 to July 31st. If you will be adding Saturday hours starting in November, you'd create a new schedule starting on November 1st with no end date, and add the Saturday hours to the grid.
Sometimes you'll need to add or remove time on a given day, but keep the rest of the surrounding schedule the same. Click the Exceptions line for a given resource to manage these changes. Add Unavailable Times when you won't be around for scheduling on a given day, for personal or other reasons. Add Extra Availability if your resource will be bookable more than normal.
By default, nobody is notified for incoming appointments. Click the Notifications link to add email address which will be notified when a new or cancelled appointment comes in.
Services are offered by resources. A reservation books a service with a resource. A given service can be offered by multiple resources, and a resource can offer multiple services. When reserving a service offered by multiple resources, the user can opt to give no preference which resource to use, to maximize the available timeslots.
To add or edit services, go to the Services tab of your appointment manager. Click the Add Service button to create a new service. When adding or editing a service, you have a number of options.
- Who Can Schedule - Permits or prevents end users from booking this service.
- Resources - Creates a mapping of which resources offer this service.
- Service Length - Both a minimum and maximum length can be given here. If the two are equal, that length is enforced. If they're different, the user can choose the length of appointment.
- Minutes Before/After - Lets you build "invisible" minutes into the appointment, not seen by end users, but factored into your schedule to give you time to prepare or clean up from an appointment.
- Price - How much does this cost to reserve? Note that this is display-only and you'll need to handle the payment locally - no money is collected through your website.
You can also click the Client Information Form link on the Services tab under a given service to create a form to ask the user questions. You'll automatically have the user's name and email address, but you can ask for additional information through this form.
Now that you've set up one or more resources and services, you can start booking appointments. To add appointments on your end, go to the Book Appointment tab on your appointment manager. You'll be asked a number of questions about what you'd like to reserve, which date, what time, and who to reserve as. You can choose an existing user, or create a new one for this appointment. Every appointment must have a user, which corresponds to a website account. If you're creating a new user, they'll be emailed their logon information automatically.
You can also create a link to the Book Appointment page for your users to create appointments themselves. The interface looks similar to the way it looks as an administrator. You can log out of your site to try it out from an anonymous user's perspective.
Appointment slots are optimized to maximize the possible number of bookings. If a resource is available from 8-10 for one-hour appointments, slots are available at 8 and 9, since an appointment at 8:30 would eat up two slots. However, as an administrator, you can override this by clicking the "Show All Slots" link on the booking screen.
Finally, now that you've got some reservations in the system, you can view them from the main Schedule tab in the appointment manager. The interface is similar to the calendar feature on your website.
Appointments will show up in the grid, color-coded by service. Click one to view the appointment details or make changes. You can also click and drag areas of the grid to make a time selection. With this time selection, you'll be given the option to add/remove availability or to book an appointment in that slot.
The List button in the left column gives you a list view of your appointments, which can be filtered. From here, you can check multiple reservations and either email them or cancel the appointments in bulk.
Images and Photos
Your image must be in one of the following formats:
- .JPG - This is the best format for photos.
- .GIF - This is a good format for non-photo images.
- .PNG - This is another good non-photo image format.
A common error is to try to use an unsupported format such as Word documents, PDF files or BMP files. You'll want to find the original images, or convert these into a supported format. Due to the wide number of variables in this realm, we do not provide support help for this.
It's not usually necessary to resize your photos if they're large - this is done automatically.
The easiest way to add an image into your site is through the Image widget. Simply click the Widgets tab at the top-left corner of your website to open the widget bar, then drag the Image widget into your page in the spot where you'd like to add it. It will ask you to choose an image, which will upload and be added to your page.
Most of our templates start with a default logo image in the corner. You can change this if you'd like. You can also add a photo to the "Our Church" box on your front page. Here's how to do this:
- Choose the Church Information item of your Content menu.
- At the bottom of this page you'll see an "Upload Church Photo" field. The photo field will add a picture to your "Our Church" box on the front page. The logo will replace the image in the top corner of your site.
- Click the "Browse" button next to this field.
- Locate the image file on your hard drive.
- When you've found it, click the "Open" button.
- Click "Save" back on the web page to submit your photo. It will show up on your main page.
See the Listing Your Staff Memebers entry for information about how to add staff member photos.
You can insert images using your HTML editor. See this section for more information.
For other spots, you can upload the image to your File Manager and then link to it using HTML.
Photo Galleries
Photo galleries are collections of similar photographs. For instance, your website could have galleries of pictures of your church, your members, your events, and anything else you want. This is where "freeform" photograps can go.
Your site starts with a single photo gallery called "General Photo Gallery". If you don't plan to add many photos on a regular basis, you may want to add all photos to this default gallery. Alternately, you can create new galleries from this page for each event. You can even create subgalleries within other galleries.
Each Group has its own photo gallery as well, which you can also add nested galleries into.
If you'd like to add a new photo gallery to contain photos, here's how:
- Choose the Photo Gallery item of your site's Content menu.
- Click the "Add Gallery" button at the top of this page.
- Select a name (ie, "Church Photos") and a description (ie, "Photographs of us") for the gallery.
- Click "Add Gallery".
- You'll be taken to your new gallery. Continue instructions below.
Let's say you have a gallery called "Recent Events", and you threw a party in January 2011. You'd want to add a nested gallery within this gallery called "January 2011 Party" to contain these photos logically. To add a nested gallery from within an existing gallery:
- Go to the gallery in question
- Click the "Add Nested Gallery" button in the yellow admin box
- Fill out the forms to add the gallery
Once you've created some galleries to place your photos into, follow these steps:
- Choose the Photo Gallery item of your site's Content menu.
- Click on the gallery where you'd like your photos to go.
- Click on the "Add Photos" button at the top of this page.
- Click the Select Images button. A file selection box will come up. Choose one or more files to upload.
- These images will begin uploading. As the server receives these files, you'll be able to edit their captions and descriptions.
If you upload a photo that needs to be rotated (due to being sideways or upside-down), you can do this online. After adding the image, click the "Edit" button associated with it, and use the "Rotate" controls to align the image correctly.
Audio and Video
Many website administrators want to add audio and video to their sites. There are numerous way to to this using ThisChurch. The first consideration is to decide what media content you'd like to upload. Some things work better than others. A simple clickable audio or video introduction to welcome your online visitors can be an effective way to greet visitors. On the other hand, adding audio and video of entire events is usually not worth the hassle. While it sounds like a nice service for your visitors, we've found that in reality, these are very rarely watched or listened to. Most people at home simply don't have the patience to concentrate on their computers that long. However, a single short (15 minute, perhaps) sampling of one of your more interesting events can be a nice "hook" for people to discover you.
The easiest way to add audio and video to your site is by dragging an Audio or Video widget (in the "Files & Media" folder) onto whichever page you'd like to add the media.
Another easy way is through our Media Manager feature, described below. You can upload audio and video as attachments to news articles. This is a good way to organize timely information, and is the easiest way to add files. Note that adding an MP3 to a news article has the added benefit of turning the news category's RSS feed into a valid Podcast.
If you need more control over the placement of the links to the files, you can upload audio and video to the File Manager, and then link the file manually into your site in the spot of your choosing. By using nested documents, you can create one file that introduces the documents, then add the audio/video documents as nested documents, which are automatically linked in. The file manager will give you a URL link that you can use to link into your site as you'd like.
We're unable to help with media creation and file encoding, since there are too many variables involved. However, a few guidelines may help you in this realm. The most important is to use the lowest encoding quality possible while still preserving the essence of your media. Many of your users will be on slow connections, and the smaller the file size, the more chance you have of people viewing your files. MP3 is recommended for audio, and 64kbps mono is a good setting for speech, 160kpbs is good for audio. Note that there's a 300 MB per-file size limit, so plan for this while encoding your media.
Rather than waiting for an MP3 file to download to play it, with the streaming media upgrade, your users can start listening almost instantly. There are several ways to offer embedded MP3s.
The first, and easiest, is to use our Media Manager, as outlined above.
You can also upload the MP3 as an attachment to a news article. When you do this, the link to the file on the right column of the article will include a link to stream the file. It will open in their preferred audio player.
The next two methods involve your File Manager. In both cases, you upload the MP3 file first. This will give you two options of what to do next:
- The "Code for Streaming Player" section will give you some raw HTML that you can paste into your HTML editor anywhere you'd like to embed a player within your page. Be sure to use your editor's source mode to paste this content. The advantages to this method are control over placement and the fact that the player is directly inside the page itself.
- The "Streaming MP3 URL" link allows you to link to the file as you would any other link. The file will open up and play in their preferred external audio player. This is handy if you need to send a link by email or prefer not to embed the file in a page.
You can embed videos from YouTube directly onto your ThisChurch website, without using any disk space for your ThisChurch account. The easiest way is to add them to your Media Manager, but for maximum flexibility, you can also embed them anywhere you have an HTML editor. Here's how:
- Go to the video's page on YouTube.
-
Locate the "Embed" box on the top-right of the page:
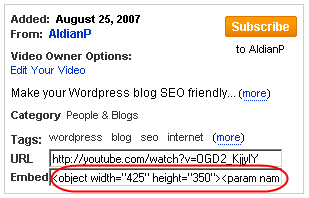
- Use your mouse to select the text in this box, then type "Ctrl-C" to copy it.
- Over on your website, locate the place you'd like to embed the video, and edit the text. Use the HTML editor's source mode to paste the text (with "Ctrl-V").
You can add background music which plays for your visitors as they browse your site. Just go to the "Background Music" item of your site's "Features" menu and upload MP3 files to the playlist. A button will show up in the corner of your site, allowing visitors to stop the music if they'd prefer not to listen.
Media Manager
The Media Manager is the easiest way to add audio and video documents to your website. You upload your media files, and we encode them to deliver to your users in a friendly YouTube-style player. You can reach it as an administrator from the "Media Manager" item of your site's "Content" menu. You can also add it to your linkbar or front page.
Each media item in a library can have a video file or an audio file, and a document to explain the item (PDF, etc). All are optional. You can also upload an image file - this will show on the player when that item is selected but you aren't currently playing a media file. The description is shown below the player when the item is selected.
Uploaded MP3 files are used as-is, so be sure to use the lowest quality setting necessary for acceptable sound. Uploaded video files are automatically re-encoded for the web on our end, but you should make sure the file is a reasonable size before adding, as large files will take a long time to upload and encode. There's a 1,000MB per-file upload limit. The original video uploads are stored offline and don't count against your quota - only the converted files count against your quota. All uploaded files are stored in your file manager for easy access in your HTML editor.
You can create multiple media manager libraries by clicking on the "Media Manager" breadcrumb you'll find on the main one. Each group also has its own library, which can be updated by group admins.
Each media manager library has a podcast feed linked below the player. This is an audio/video podcast, so that your users can subscribe for updates which automatically show up on their computers, iPods or other mobile devices.
Widgets are available for media items, so you can add them to any page on your site. In your "Widgets" bar, open the "Files & Media" folder, and drag the "Audio" or "Video" widget onto a page.
The Settings button in the admin links for a media library allows you to choose a number of quality settings.
- Resolution: This affects the resolution (size) of the player itself, and of all video files uploaded after that point.
- Aspect Ratio: We default the player to a standard 4:3 aspect ratio, as in older TVs. You can change this to a wider 16:9 or 16:10 ratio. This affects only the player - videos are encoded with their native aspect ratio. If you upload mostly widescreen videos, you'll want to change this.
- Scaling: If you have a widescreen video on a normal player window, or vice versa, we'll add letterbox bars. If you'd rather we stretched it to fill the screen, you can choose that here.
For video, it's difficult to say which formats will work, because even within a specific format, there are many variations that may or may not be supported. In general, you're best off using one of the following formats, roughly in order of preference:
- MP4 / H.264
- AVCHD (.MTS / .MT2S)
- .AVI
- .WMV
- .MOV
Got a video out there on YouTube that you want to share with your visitors? It's simple with our Media Manager:
- Go to the Media Manager item of your site's Content menu.
- Click the Add Media button in the yellow box.
- Fill out the fields as needed. In the Video Upload box, click the Link to a YouTube Video link.
- Copy and paste the URL of the YouTube video. For example: http://www.youtube.com/watch?v=oHg5SJYRHA0
Videos embedded through YouTube in this way will take no disk space away from your quota!
Live Video Broadcasting
We now offer an exciting new upgrade that allows you to broadcast live video of your events or anything else you'd like to offer to your viewers. With nothing more than a laptop with a webcam and an internet connection, you can be broadcasting your message to the world in realtime!
As this feature requires a very advanced backend in our software, we do need to charge a small monthly fee of $9.99 to provide this feature. This gives you 50 viewer-hours of traffic per month (for instance, if 4 viewers listen to your broadcast for ½ hour each, that's 2 viewer-hours). Above that, we bill $0.50 per viewer-hour at the end of the monthly term.
You can cancel this feature anytime. Like your website, it's on a month-by-month contract with no long-term commitment. Paying annually ($99) gets you a two-month price break, plus a prorated refund if you decide to cancel the feature.
It's incredibly easy to get started - if you have a computer with a webcam and a web browser, you're ready to broadcast.
For better video, plug in an external camera that supports the DV protocol, usually with a Firewire port. Choose that camera from the "Video Source" dropdown in the broadcasting page. For better audio, plug a feed from the PA system or soundboard into your PC's line input and choose that audio input from the "Audio Source" dropdown in the broadcasting page.
Once we've enabled the upgrade, it's simple to broadcast:
- Go to the Live Broadcasting item of your site's Content menu, where you'll see the console.
- You'll probably see a small pop-up window asking you to grant access to your webcam to the software - click to accept this.
- Double-check that the Video Source and Audio Source drop-downs are correct.
- Click the large Start Broadcast button. You're talking to the world!
We've given you a number of options of how to share the broadcast with your viewers.
- Media Manager: Your live broadcast will show up as the first video in your media manager by default. Click the "Video" button to watch.
- Widget: Drag the Live Broadcast widget in the "Files & Media" folder of your widget bar onto any page of your site, and a viewer will be added.
- Linkbar: There's now a "Broadcast" link in the unused section of your linkbar options. Add this to the linkbar and your users can see it on a dedicated page.
With all but the front-page version, there's a chat module below the broadcast. This can be disabled in the Media Manager settings if desired.
File Manager
As hard as we try to automate page creation with ThisChurch, you may occasionally need to create a page that we don't have a template for. Before doing this, make sure that there isn't a good place to put it. The news section is a great place for many documents.
Your site's file manager works much like Windows Explorer. There's a root folder, called "Documents" by default. In this folder are files, along with nested folders. These folders can contain more subfolders and more files, and so on. You can navigate to a given file or folder using the tree on the left of the screen, and on the right side you'll be given a list of commands inside of a yellow box.
You can add a file by:
- Go to the File Manager item of your site's Content menu.
- Optional: navigate to a given folder where you'd like to add the file. By default, there's only the "Documents" folder, so this isn't necessary.
- Click either the "Create File" link (if you'd like to type or paste the contents by hand), or the "Upload File" link (if you'd like to send an existing file from your hard drive).
- Follow the directions on the form to add the file.
Sometimes you need more than plain text to create a file. That's why we've made it possible to build a page with widgets. When creating a file, choose the Build File button, and you'll be taken to a blank page with a single text block and the widgets bar expanded. Double-click the text block to edit the text, and drag and drop widgets from the bar to add content to your page.
You can assign administrators for each file manager group. See the "Admins" button on the file manager page. This will only give them access to this area of the site.
When non-binary files (text, html, etc) are edited, a revision history is saved. In other words, if you make a change you didn't intend, you can roll back to a previous version at any time. You can also see what has changed from revision to revision with the "Diff" link.
When uploading images to the file manager, you can resize them if you wish. See the "Resize" button when viewing the page for the image.
Each group has its own file manager as well, and any group admins can add and manage files for their own file manager. There is a global quota for all files in all file managers and photo galleries combined.
If you have a group of pages you'd like to easy create and link together, you can use nested documents. When viewing a regular HTML file in your File Manager (rather than a directory), you'll see a button called "Nested File". This will create a subpage of the current document, and will automatically create a link to it in the top-right corner.
You need only to link the "root" document into your site - the rest are accessible from there.
Upon creating a document in your site's file manager, it's just sitting online and is not being used. You need to link it into your site in order for it to be seen by your users. Here are a few methods of doing that:
- When viewing the file's properties in your file manager, click the "Linkbar" button.
- Copy the "Full URL Address" text and link it into your site by hand. You can do this with your HTML editor.
- When viewing the page itself, if it's templated, see the "Add to Linkbar" item of the admin bar's "This Page" menu.
- Simply copy the "Full URL Address" and send it via email to someone if you'd rather not link it into the site but you still want to share it with specific people.
- Use the File List widget (described below).
The "File List" widget in the "Files & Media" folder links to trees of documents in your file manager. Add the widget to a page, then in the "Folder:" item of the options pane, choose the folder you'd like to start from.
Note that admin-only documents will never be linked, and documents which are only visible to logged-in users will not be shown to anonymous users. Special folders ("Media", "News Article Attachments", etc) can be shown specifically, but won't show in a full file manager list.
Polls
Most church websites are a form of one-way communication, but using polls, you can complete the circuit and find out what your members think.
For privacy reasons, poll voting is completely anonymous. However, safeguards are in place to prevent multiple votes from one person. We use a two pronged approach for this - cookies hide the submission form for users who have already voted, and IP addresses are recorded for each vote.
You have the choice of whether to allow anonymous users to vote on polls or not, on a site-wide basis. This can be selected from the "Preferences" item of your site's "Layout" menu. We highly recommend allowing anonymous users to vote, since multiple vote safeguards are in place and since you'll receive far more votes this way.
Each poll category has a list of past, current and future polls. Each poll has a start date, and an optional end date. There can only be one active poll per category - if multiple polls are within the start/end date parameters, only the one with the most recent start date is shown.
In addition to the poll category on the front page of your site, meant for site-wide polls, each group has its own poll category.
Once at this page, follow these steps to add a poll:
- Click the "Add Poll" link.
- Enter a question for the poll to ask. Try to keep this relatively short.
- Type two or more poll options in the lines below. The option names should also be as short as possible. You can have up to 10 options per poll.
- If desired, give the poll a start and an end date. Leaving these as they are will ensure that the poll will go up immediately.
Other Content
At the top of your site below your site's header, you'll see a list of links such as "About Us", "News", "Calendar", etc. These links serve as the primary navigation for your visitors to the various areas of your site. This makes it very important that you organize these to point to the areas of your site that you'd like to highlight.
When logged on as an administrator, when you hover your mouse over the linkbar, an "Edit Linkbar" button will appear above it. Hit this button to make changes. From this page, you'll see the tree of links. Links may be nested into drop-down menus of any depth.
You can click and drag the links to reorder them in the tree. To add a new link to the linkbar, just click the "Add New Link" button. Most of the available links are in the tree in the window that pops up. Click the link you'd like to use, and then click the "Add Link" button.
To create a new item in the linkbar:
- Go to the page on your site that you'd like to link.
- Choose the "Add to Linkbar" from your site's "This Page" menu (in the yellow bar at the top of your site).
- Fill out the form. If you'd like to add a new link into the tree beneath an existing link, select the parent link in the "File Under" drop-down.
One important tip: make sure that the linkbar is narrow enough so that horizontal scrolling isn't necessary in narrow browsers. About 8-10 links with short names is all we recommend.
You and your users have the ability to make requests for prayers, using our Prayer Requests feature. Under the "Linkbar" item of your site's "Content" menu, be sure that the "Prayers" link is used on your site's linkbar. Click the link to enter the prayer request area.
When posting a request, you have some privacy options. If it's a sensitive issue that the poster would like to keep hidden from the general public, they can set the "Who Can View?" selection to "Administrators Only". If it's a very sensitive request, they can remain anonymous using the "Anonymity" selection. This will hide their identity from everyone, including administrators.
As for the administrators, all site admins are automatically included in this group. You can also appoint other users with the "Permissions" link on the main page.
You can also set a list of email addresses to be notified when a new prayer request is posted, using the "Notifications" button on the main prayer request page's yellow admin box. All addresses listed on this form will be emailed when a new prayer request is added (whether public or not).
When a request is first posted, its status is set to "Open". Once it's been processed and you'd like to hide it from the general public, you can close the request with the "Close Request" button. You can also delete requests entirely if they're not within your terms of service.
Tired of answering the same questions over and over? You can create a Frequently Asked Questions list (often called a "FAQ"). This is available from the FAQs item of your site's Content menu. Click to view the FAQ list you'd like to edit, or use the Add FAQ button to create a new document.
From the FAQ's page, you can add your content. On the simple side, you can simply click the Add Question w/ No Category button to add questions. You can also create subcategories with the Add Category button, and add questions to specific categories. For instance, you might have categories for "About Us", "History", etc. Each of these categories would have more specific questions underneath them.
A FAQ that you've created is not automatically linked into the site. You can do this manually, or click the Add to Linkbar item of the This Page menu.
Perhaps the most important feature that makes ThisChurch sites powerful is the idea of user accounts. Anonymous users can browse most parts of your site at will without needing accounts. However, many of the fun features require them to create an account, which gives them their own identity on your site. It's very easy for them to do, and it gives them a reason to visit over and over, and it gives them a place to share information, add friends (as in MySpace and Facebook), share photos, and more with other members.
Each account has a username and password combination that they use to log on. They remain logged on until they click the "Log Off" link, or move to a different computer.
If you have a user that would like to remove their account, you can do this for them using the Directory item of your site's Users menu. Alternately, you can direct them to the Customize Profile link on your site's main page to remove their account. There's a link in the upper-right corner of this page.
Each user has their own profile page, which can be seen by clicking on their name. The Layout button on their account editing page allows users to choose what shows on their page, and to whom.
Have you tried to log onto your site, and you don't receive an error message but you're taken back to your site as an anonymous user? This is usually caused by a browser which has cookies disabled. These are required to log onto your site, and it's safe to enable them. Here is how to enable cookies for your browser.
Under the Directory item of your site's Users menu, you'll see a list of your users. This page is not linked in to your public linkbar by default, but can be added if you choose. This page has additional controls when you're logged in as an administrator, and is your central place to control the accounts that are added to your site. In addition to the public features that allow you to view profiles, search for accounts and send messages to users, you can also edit and delete accounts, as well as view logs for individual users.
By default, anyone can view your user directory and the profiles it contains (minus the email addresses, which are only shown to logged-on users for spam prevention purposes). If you'd like to lock down the user directory, see the Manage Permissions button at the top of the main user directory page. From there, you can set the system to only allow logged on users to view these pages, or you can also set it to specific accounts only. Site administrators can always view the directory.
By default, anyone can create an account for themselves without needing validation of their email address or approval from an administrator. If you're nervous about this, you can protect the process using the Preferences item of your site's Layout menu.
The Account Validation item on this page, there are three options:
- No Validation (default) - Anyone can create an account immediately.
- Email Address Verification - Anyone can create an account, but they must first validate their email address. Nothing is necessary on your part with this option. If you delete an account with a given email address, they will not be able to create another account with the same address.
- Administrator Approval - This means the user can create an account, but it can't be used until an administrator specifically approves it. If you choose this option, your "Administration" box on your site's front page will show the pending user accounts.
Many pages throughout your site require users to be logged on in order to view. There are ways to protect pages from anonymous visitors. From the "Preferences" item of your site's "Layout" menu, you can access the following items:
-
Lockdown Directories to Anonymous Users (link at top of page) - This is the most flexible option, allowing you to lock down any area of the site. You can lock down directories (such as
/mod/group/to lock down all groups), or you can lock down individual files (such as/mod/account/view.phpto stop profile viewing). Be careful with this, as it's possible to lock down things that should be available to everyone. - Allow Anonymous Posts (checked by default) - Uncheck this to disallow anonymous users from posting messages. Note that this will probably eliminate most of the legitimate posts on your site as well, since many users won't want to get an account.
- Allow Anonymous Poll Votes (checked by default) - Uncheck this to require accounts for voting on polls. Note that even with this checked, it's very difficult for users to vote multiple times, so this option may only serve to reduce the number of legitimate votes.
This can be done from the "Account Creator" item of your site's "Users" menu. From here, you can create up to 20 accounts on one form. Fill in the relevant details for each line you wish to use, and check the "Make Admin" checkbox to give them global administrative rights to your site.
For a quicker account setup, if you have only a list of email addresses, click the "Create By Email" link. Here you can paste a list of email addresses and not go through the username / name / etc selection process.
On either of these options, each created account will receive an email with their automatically created password, and instructions to log on. Nothing is necessary on your part.
By default, an account simply has the rights of a standard user. These accounts can post messages, join groups and chat with other members, but they can't change the core content of the website. When you create your website, the username "admin" has full rights to change anything on the website. If you'd like to assign global administrative rights to another user, there are a few ways to do this:
- If the user doesn't yet have an account, go to the "Account Creator" item of your site's "Users" menu. Add a line for the user, and click the "Make Admin" box. Click "Add Users", and the account will be created with the user receiving an email with logon information.
- If the user does already have an account, go to the "Administrators" item of your site's "Users" menu. Select the user under the "Grant Full Admin Rights to:" drop-down to add them.
- If the user does already have an account, you can alternately view their account page by clicking on their name somewhere on the site. Click the "Edit" link on their profile page, and choose the "Yes" option for "Is this user a global site administrator?".
Note that you don't necessarily need to give away the keys to the castle. Many areas of the site allow you to appoint sub-administrators. These areas include groups, calendars, news categories, and galleries. There are two ways to assign sub-administrators:
- Go to the entity in question, and go through the steps to adding a subadmin. For instance, for a group, you'd go to that group, click "Make Changes", and click the "Subscribers and Admins" link. Each area has a different method.
- Edit a non-admin's profile in the "User Directory", and you'll see checkboxes to assign subadministrator rights to all supported areas on the site.
Walkthrough: Try Out a User Account
You have an account on your site, even if you don't know it. When you created your trial site, you were automatically logged on to a special account with the username of 'admin'. The admin account is just like any other account, except that it has permissions to update the site.
Since you are probably still logged on as the administrator, you will need to log off in order to use this tutorial. This tutorial will put you in the shoes of a regular visitor of this site.
- Go to the front page of your site. This is what your users will first see.
- Log off of the administrator account if you haven't done so. Click the "Log Out" link on your front page.
- Notice the "Create an account" link on your front page, in the "Your Account" box. Click this.
- Fill out the simple form and click the "Create Account" button. Depending on how you set up your account, you may need to follow the instructions of an email to validate your account. You are now a registered user on your site.
- Now that you are a registered user, go back to the main page.
- Click the "Customize Profile" link. This page is the central place for you to edit your account.
- Whenever you need to change information such as your email address, name, or password, simply go to this page to update it. You can also use the more advanced customization features.
- We'll add your location the account now. Go to the "Customize Your Profile" link in the "Your Account" box on your front page.
- Click on the "Location" button.
- Fill in either the City/State boxes, or the Zip Code box. For security reasons, your users are not asked to submit more detailed location information.
- Click the "Submit Location" button.
- Your location will now show up in your profile, and it will also be searchable in the member location search.
- We'll add some photographs to the account now. Go to the "Customize Your Profile" link again.
- Click on the "Photos" link.
-
Click the "Browse" or "Choose File" button and choose a photo. It will be on your hard drive in a file such as
C:\photo.jpg. The photo must be in .JPG, .GIF or .PNG formats (more info). - Give the photo a caption.
- Click the "Add Photo" button.
When viewing the profile of another member, there are a few fun things that can be done to interact with this person:
- Members can send messages to one another. View the profile of another member, and click the "Send Message" link.
- Members can chat in real time to another member, using the "Instant Message" link in another user's profile.
- There's more features than we could ever name here. Just play around and try it out, that's half of the fun!
Groups
Groups are one of the most powerful ThisChurch features. Each group is like a miniature version of your website, complete with its own membership, news, photo galleries, polls, forums, etc.
You can access your groups feature from the Groups item of your site's Features menu.
Public groups can be viewed by anyone, and anyone can join. Private groups can only be viewed by people logged on with a user account that you've specifically added to the group membership from the "Subscribers and Admins" link on the "Make Changes" menu, and aren't recommended except for the most sensitive topics. Password-protected groups don't require a user logon, but they need a private password provided by you.
Administrators can be assigned on a per-group basis, so they have full control over their area, but don't have the "keys to the castle" for the rest of the site. From a given group, if you're a group administrator, you'll see a "Make Changes" link at the top of the page. This is where most of the group administration is done.
From this menu, you can assign additional administrators from the "Subscribers and Admins" link. Click the "Add" button to assign new members and administrators. Note that they must already have an account, so use the Account Creator if they aren't yet registered on the site.
Note that global site administrators are automatically silent administrators over every group, public or private.
One of the main reasons to use groups is to create a protected section of your website where only certain users can access the contents. When adding or editing a group, the Who Can Change or View? field allows you to control this. There are several settings for this:
- Everyone - This means your group will be completely unprotected - anyone can view, and any logged-on users can join and participate.
- Only Those I Invite - An administrator must add a user to the group before they'll be able to view or participate in the group.
- Any Logged In Users - Any logged-in users who visit the group will be automatically added to it and can view/participate. This setting works well if you have administrator validation turned on for new accounts (in the Preferences item of your site's Layout menu).
- Only Those With a Password - You can choose a password that must be given to join a group.
The layout of the group page is controlled through widgets. You can open up the widgets bar on the left side of your site, then drag new widgets in or rearrange your existing ones.
The default widgets on a group page, such as news and calendar, are special, in that they're tied to the group and respect the permissions you give the group. You can add additional widgets to a private group, and while the custom widgets themselves can only be seen by group members, some will create underlying content that's available elsewhere on the site. Contact support if you have questions about security in this realm.
From the "Make Changes" link at the top of each group, you'll see all of the options for adding, updating and removing content for the group. Most of these are the same as you'll see elsewhere on the site.
Mailing Lists
In order to stay in touch with your users, you'll want to collect their email addresses. We make this easy with the mailing list manager. Make sure the "Mail List Signup" widget is on your page. This will allow users to join your mailing list. The "Mailing Lists" item of your site's "Users" menu is the center of this feature. You'll see at least one list, the Site Mailing List. This is where the front-page mailing list signups go to.
If you have a pre-existing list of subscribers from a previous list, you can add them by clicking the "Subscribers" link next to a given list. Click the "Add Addresses" link from this page to add subscribers.
Each of your groups also has an email list available. These lists are fixed to the email addresses of the group members and can't be manually controlled.
If you'd like to use a third-party service such as iContact to send email, we offer an export feature to make this easy. To synchronize your website mailing list to your iContact mailing list:
- Go to the "Mailing Lists" item of your site's "Users" menu.
- Click "Export" next to the list you'd like to synchronize.
- Select all of the text on your screen (usually Ctrl-A), then copy it (Ctrl-C).
- Log onto iContact, and click the My Contacts tab at the top.
- In the Add Contacts box, click Copy & Paste.
- Click your mouse in the large input box, and paste (Ctrl-V). Click the Add Contacts button.
Your lists are now synchronized. Any users who were already synchronized to your iContact list will remain there, any new users will be added, and anyone who's unsubscribed will remain unsubscribed. You'll want to do this periodically to keep your iContact list up-to-date.
To send email to a mailing list:
- Go to the "Mailing Lists" item of your site's "Features" menu.
- Click the "Send" button next to the list you'd like to email.
- Type the email content, and click the send button to begin the email delivery. Emails are sent at about 1 per 5-10 seconds, so a large list may take a bit to complete the mailing.
By default, the sender's address is a no-reply address. If you'd like to use your own email address, just click the "Add" button next to the dropdown, and you'll be prompted to add it. You'll need to click a link in your mailbox to validate your mailbox.
Discussion & Interaction
Forums are at the core of the interactive aspect of your website. You've probably seen these on other sites; they are a way for your users to discuss things at their own pace, rather than in real time (as in, for instance, the chat area). There are several levels involved in the forums:
- Forums are at the highest level. These contain topics, which in turn contain posts. By default, your site has two forums: the Site Forum, and Prayer Requests. Each group has its own forum as well.
- Topics are contained within forums. For example, a "Chatter" forum might have a topic called "What's Your Favorite Color?". Each topic contains one or more posts.
- Posts are contained within topics. The "What's Your Favorite Color?" topic may have started out with the initial post, and various people may have responded to this with their ruminations on the virtues of puce in separate posts within this topic.
You can assign forum moderators with the "Admins" button on a given forum's main page. Moderators are able to change topic titles and remove topics, and also to edit and delete the messages that the topics contain.
The topics list in a forum is shown with the most recent updates at the top. If you have a topic in a given forum that's very important, and you want it to always be on top, use the "Stick" button.
Each group has its own chat room. There is a static box on the group's page, with a link to the "PowerWall", which is the full chat room.
Registered users on your site can privately communicate with one another using two features: private messages, and IMs.
Private messages are sent at any time to a user, and will appear on their screen the next time the visit the site. Additionally, they can choose to be notified by email when new private messages arrive.
IMs (instant messages) are similar to private messages, but work more like a live chat room. These are only useful when both members are online at the same time, and work similar to AIM or Yahoo! Messenger.
Both of these can be initiated by viewing the target user's profile.
In addition to the dedicated discussion areas in the forums, much of the content that you create on your site (news article, calendar events, blog posts, etc) allows users to discuss it. This is normally a good thing, since it promotes interaction in your site. Administrators are able to manage the discussion areas in order to remove inappropriate posts. They also have access to Close a discussion area, which keeps it visible but disables further posts, as well as to Hide it, which removes it from the page entirely.
You can disable discussion entirely from the "Preferences" item of your site's "Layout" menu.
Custom Forms
There may be times when you need to collect information from your visitors. Some examples of this would be event signup forms, surveys, and data collectors. This can be done with the "Custom Forms" item of your site's "Features" menu.
A bit of terminology: a field is a single item in the form. It's typically a single question you're asking your user, but it can also refer to a formatting item (a note, header, or line).
Note that it's unsafe to ask for credit cards from this feature, and it's prohibited by our Acceptable Use Policy. Please contact them separately to collect payment, if needed.
From the Custom Forms item of the Features menu, you'll see your form manager. On the left panel, you'll see a list of your forms. On the right, you'll be able to make changes to your form. One custom form has already been created, called "Account Questions". This works the same as other custom forms, except that the questions you add are added to the "Customize Profile" page for users, and the results will be displayed on the user's profile (for fields you haven't specifically blocked).
To create a form of your own, click the "Create Form" button. Fill out the form:
- Form Name: The name, such as "XYZ Event Signup"
- Multiple Responses: If this is set to "No", each unique user can only respond once. When set to "Yes", a user can respond multiple times.
- Allow Anonymous: If this is set to "Yes", anyone can respond, with or without an account. If set to "No", only logged-in users can respond.
Click the "Save Changes" to create the form, which will start off having no fields.
Your new blank form will have no questions. To add some, click the Add Field button on top of the right pane. You'll be given a selection of several field types to choose from:
-
Question Options:
- Text Box: The most common, ask the user a question and give them a box to type an answer. From within this, you'll be given several formatting options (One-Line, Paragraph, Email Address, Phone Number and URL Address).
- Dropdown: Sometimes you'll have a list of available options, rather than letting them type anything. This is your best bet for a long list. You type your options, one per line, in the box - or select from some common premade lists.
- Radio: Radio buttons work much like a dropdown list, but all of the options are shown outright, so they're best for very short lists.
- Check: This lets your user turn an option on or off. The prompt is shown on the line before the checkbox, and the label is shown to the right of the box.
- Date: Asks the user for a date, including a friendly calendar widget to help them find it.
- Score: Asks the user to rank something in a range of 1 to a number of your choice. A friendly slider helps them choose. This is ideal for satisfaction surveys. You can set a label for bottom and top of the range, such as "Poor" to "Excellent".
- Yes/No: Like the check box, but optimized for yes/no questions.
-
Formatting Options (doesn't ask a question)
- Note: Allows you to insert some arbitrary text into the form to explain something.
- Fieldset: Starts a labelled box to group a set of similar fields. The box continues until a new fieldset is added, or the form ends.
- Horizontal Line: Inserts a simple line to separate sections.
All question fields have a Prompt setting, which is the question you're asking your users. Many field types have advanced options that can be seen from the Show Advanced link. Some of those include:
- Placeholder: Greyed-out text shown in the box before your user types anything, at which point, it vanishes.
- Hint: Shown after the prompt, but before the input, you can explain details about what you're asking.
- Required: If required, the user must answer that question to submit the form.
- Size: For text boxes, you can give a maximum length (a ZIP code could be 5). Leave blank to not have a limit.
- Hide from non-admins: Only shown for the Account Questions form, it flags a field as private. This allows you to ask incoming users for something like a telephone number, but it will only show that information to administrators.
Click the Save Field button and the field will appear in the form.
Sometimes you'll want to make changes to the fields in a form. That's easy, just go to the form in the Custom Forms editor, hover your mouse over a field; Edit and Delete buttons will appear. To move a field up and down, click and drag it using the arrow to the left into the position you'd like.
To see the responses to your form, click the Responses button. From that page, you can click the Load in Separate Page button for a larger view, or the Download CSV File if you'd like to import it into a spreadsheet or database for more detailed analysis.
By default, when someone fills out a form, it will go into the results table, but nothing else will happen. If you'd like to be notified when a new response is added, click the Notifications button in the form editor.
When you've added the necessary fields to your form, you'll usually need to link it into your site in order for people to use it. See the bottom pane of the form editor for a shortcut to add a form to your linkbar, as well as a path you can use to link to the form in other areas of your site.
A common use of the forms creator is to create a signup for for events. We made that easy with the built-in calendar signup form feature.
The layout template of your site determines the overall layout of your site. We offer an assortment of options for your site, which are updated on a regular basis. You can choose your template from the "Look & Feel" item of your site's "Layout" menu.
With certain templates, you can choose your color scheme from the template page, and if you'd like, you can also edit the colors with a point-and-click interface. You'll see a number of options available by default under the "Color Themes" area of this page. To use one, click the "Choose" link beneath it. To make changes, click the "Edit" link beneath it. A copy will be created that you can edit without changing the original.
There are several sections on this page that allow you to edit various areas of the site. The "Main Page" area changes the primary colors that form every page. The "Highlight Colors" area determine the color used when tables are shown on your site, such as the calendar and forums list, and the boxes around the widgets on the front page of your site. Click the "Background", "Foreground" or "Link" colors to edit the colors for a given area.
Warning: This is an advanced feature which requires solid knowledge of HTML and CSS. While we don't provide HTML and CSS support, sites like HTMLHelp.com are an excellent resource for help if you need it.
To edit your layout templates, go to the "Look & Feel" item of your site's "Layout" menu. Under the "Layouts" section of this page will be listed your options. To make changes, you can either click Edit to change the active layout, or Clone to create a copy of the layout and work from that.
You'll see a page with raw HTML mixed in with some expansions, such as |TITLE|. These are special words that expand into other text depending on the specific page. For instance, |TITLE| turns into "Forums" when you're on your forums page. Click over to the "Help" tab in the editor for a list of all possible expansions. The one absolutely required expansion is |BODY|, which is the dividing line between your header and footer - where the generated code for a given page is placed.
The "CSS" tab allows you to style the HTML code. You can use standard CSS, but our system also parses LessCSS, which is an easier way to handle nested styles. You can also add |COLOR| expansions here.
The "Script" tab is a place to insert Javascript for the page. JQuery is loaded with every page, so you can use that safely.
In the editor, you'll see a History button. Click that to see the changes you've made in the past (since the feature was added in February 2011). You can revert back to a given version from this page, in case you made changes that you want to roll back.
At the top of every page on your site, you'll see two things in the header: your site name, and the title of the page that you're currently on. For most of our templates, you can customize the fonts and style for these headers from the Header Fonts item of your site's Layout menu.
There are several tabs of font options available. You can choose the font size, which is measured as it is on your word processor; around 20 is a small font size, around 50 is a large one. You can also create a shadow to help your text stand out against a busy background. In the "Shadow" dropdown, you have several color options available, which can be used as a halo effect (directly behind the words), or a drop shadow (offset to give a three-dimensional effect).
You can add a personal touch to your website by replacing the photo in the header with your own images. To do this, you'll need to choose a template that supports this, including "Dandelion", "Clean Elegance", "Monochrome Diamonds", "Blue Glow", "Photo Caterpillar", "Custom Header", and others.
To change your header photos on a supported template, you can either click the "Edit" button at the top-left of the header image, or go to the "Header Photos" item of your site's "Layout" menu. This will take you to the familiar gallery page, which is how your images are stored. A nice benefit to this feature is that if you upload multiple images to the gallery, it will scroll through them, with clean fade transitions.
Click the "Add Photo" button to upload a new photo. You don't need to crop or resize the photo on your end, and this is one situation where adding the largest image possible is to your benefit. When you upload the file, it will take you to a new page which allows you to crop the image to its required size. Choose your crop carefully with regards to where your text will go. If you have an important face, be sure it won't be covered up by the header text. We highly recommend using a halo effect with your header text when using header photos, to ensure your text stands out.
Changing Your Front-Page Layout
There are two aspects to your front-page layout: the HTML template, and the module design. The HTML template controls the basic framework of your front page, such as whether it has one, two or three columns of modules, or is completely freeform and does not use modules at all. The module design controls how the widget boxes appear.
Your front page is just a collection of widgets. Open the widgets bar on the left side of your page, and you can drag new widgets into your layout, rearrange the ones you have by clicking and dragging them, or remove them by hovering over them and clicking the Delete button.
Note that the Text widget can have more than one text option, which tells the page to cycle through the options in realtime.
Widgets added to your front page automatically have highlighting boxes added to them. You can also customize the HTML code for the widgt boxes themselves from the "Front-Page Layout" item of your site's "Layout" menu. You can choose an existing style or create your own if you're skilled with HTML and CSS.
When editing the code for a widget box template, the following expansions can be used:
- |HEADER| - The title of the widget. Required.
- |BLOCK| - The body of the widget. Required.
- |COLOR(module_header_bg)| - Expands to the six-character hex code for a given color in the current theme. Note that you must include a hash character (#) before the value yourself. Possible values: module_header_bg, module_header_fg, module_body_bg, module_body_fg, body_bg, body_fg.
Our pricing philosophy is simple: we don't want to charge extra money for features that don't cost us extra to offer, so almost all of our features are included in your church's monthly fee out of the box. However, a few features can't be included with every site, so we offer them as premium services. All of these can be seen and purchased from our upgrades page (from the Upgrade item of your site's Help menu. Here is a list of our currently available account upgrades:
- Search Engine Submission: We will submit your website to over 70 of the top search engines, including Google, Yahoo and Bing, for $50.
- Premium Search Engine Submission: Same as above, except we also include top Christian directories and search engines, for $100.
- Detailed Usage Statistics: This gives you detailed data of how many visits your site is getting, and what pages are most popular.
- Custom Development: If you need a piece of software that we don't offer, or if you need modifications to our internal software to fit your needs, drop us a line with your detailed needs and we'll give you a free estimate.
Additionally, you'll also probably want a domain name for your site. See the "Domain Names" section of the FAQ for more information.
Your website comes with a temporary website address to get you started. It looks like myname.thischurch.org. You're welcomed to keep this as your site's primary address, but most people choose to give it their own name, such as myname.com. This is called a domain name.
Once signed up, you'll be able to set up a domain name for your site. If you already own one from a previous site, you can use it with us for no additional charge. Alternately, you can purchase one through us for $25/year. Both of these can be done from the "Domain/Email" item of your site's "Features" menu.
The process of transferring an existing domain name to your site with us is relatively simple:
- Sign up to activate your website.
- Go to the "Domain/Email" item of your site's "Features" menu and select the domain name to transfer.
- Wait a short while for us to process this, then go back to the "Domain/Email" item of your site's "Features" menu. At this point, any email addresses used at the old host must now be recreated on our end.
- Once you've done this, make the quick change outlined here. The domain name will be moved within a day (usually an hour or less).
Email at Your Domain
Most people who get a domain for their website, say, mysite.org for this example, will want to be able to receive mail at their domain name. In other words, [email protected] can go to the webmaster of the site. We offer a fixed number of POP email accounts, depending on your package. These are true mailboxes, separate from your existing mail. In order to view the mail they contain, you must separately check them.
Everything is controlled from the "Domain/Email" selection of the "Features" menu in your administration panel. To create a mailbox, click the "Add" button next to the "Currently Used Mailboxes" - choose a username (something@example.com), and give their current email address. The account will be created and they'll be emailed their logon information with nothing else needed from you.
The easiest way to read and send email from your addresses is from the "Webmail" item of your site's "Features" menu. It requires no setup and allows you to check from anywhere you have a web browser.
Any POP mail client will work for reading and sending email. Microsoft Outlook and Mozilla Thunderbird are popular. You can also use GMail. The settings that you will need to use are as follows, using [email protected] with password "mypass" as an example:
| POP Server: | mail.example.com (substitute your domain name) |
| POP Username: | username@example.com (the full email address of your mailbox!) |
| POP Password: | Your email password (different than your website password!) |
| Outgoing/SMTP Server: | [Check with your internet provider, see below] |
Important: POP accounts are unrelated to website accounts. The username and password you use for email may or may not be the same as the ones you use to access your website. Please see the "Domain/Email" item of your site's "Features" menu to reset your email password if you're having authentication failures.
Due to spam concerns, you'll want to use your ISP's SMTP server to send mail. You can contact your internet provider if you don't know the correct settings for this. For instance, if you're a Verizon customer, you'd use outgoing.verizon.net.
While we don't support mail forwarding to external accounts, most webmail services allow you to access external POP mail seamlessly within their interface. Help documents are available from Yahoo! Mail and Gmail. Important: these services may send a confirmation code to your ThisChurch mailbox to confirm that you own it. You'll need to set up a traditional POP mail client as noted above to receive this message.
Your Site's HTML Editor
The HTML editor is one of the power features we offer that makes it possible for you to update your site without knowing HTML. Whenever you see a box that looks a little like a Microsoft Word document that allows you to use controls such as Bold, Italics, etc. to edit your content, this is the HTML editor.
- When editing data on your site inside of the HTML editor, place your cursor in the editor box in the location where you'd like the image to go.
- Locate and click the icon that looks like a picture frame:

- A box will pop up. Click the "Browse Server" button:

- Another window will pop up. Click the "Browse..." button:

- Another box will pop up. Locate the image file on your hard drive. Note that it must be in .JPG, .GIF, or .PNG format! When you have selected the file to upload, click the "Open" button.

- Back at the first popup box, click the "Upload" button.
- You should see your image appear in the box above. Click it.
- Click the "Ok" button on the next window, and your image will be inserted into your document.
A key feature of your site's HTML is the ability to add links to other files, such as one you've created in your File Manager. Since this may not be apparent if you've never used an HTML editor, here is the process you'd use to link a word of text to another website, in this case, Yahoo!.
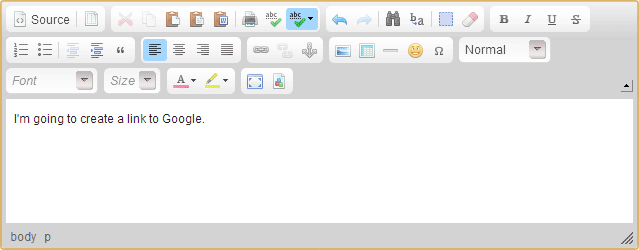
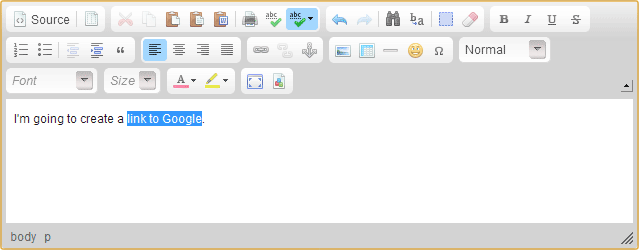
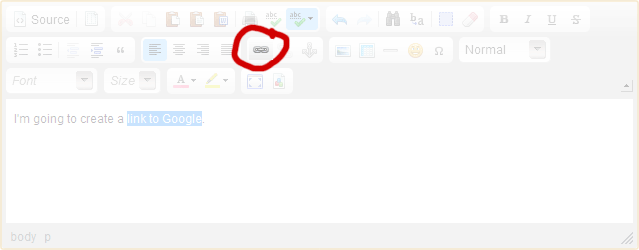


- Type out the text you'd like to use in your document, which will contain the link:
- Use your mouse to highlight the text you'd like to use to link to the other site:
- Click the "Link" icon, which looks like a globe with a chain on top of it:
- A box will pop up asking you for the address you'd like to link to. Fill this in, then click the OK button:
- You will be returned to your document, and your link will be blue and underlined, to signify that it is an active link:
Most times, when using the site's HTML editor to add and edit content, you can do what you need to do using the buttons provided. Occasionally, however, you may need to add raw HTML. The most common reason for this is to add scripted content from another website, such as a news feed. Or, you may just want to have more control over formatting if you know HTML.
Our editor provides this functionality. If you'd like to switch into raw HTML mode, simply click the "Source" checkbox in the editor:

Type or paste the content you need to insert as raw HTML, and then uncheck the source checkbox when done to return to the standard editor mode.
One other common question about formatting within the editor involves how to insert a single linebreak. Since the editor was designed to work like a word processor, pressing "Enter" adds a double-spaced paragraph break. If you'd like to only add a single linebreak, hold the "Shift" key while pressing "Enter".
Store: Merchandise and Donations
Selling merchandise and accepting donations are great ways to raise money. We have a built-in store manager that makes this process easy. To get started, all you need is to set up a PayPal account.
Your website can have one or more stores, and each store can have one or more items for sale. By default, there are no stores on your site. To create one:
- Go to the Stores item of your site's Features menu.
- Click the Add Store button.
- Fill out the form. The tax rate is optional, and applies to all orders - consult your local tax code for this.
You now have a new, empty store. To add an item:
- Go to the store, if you're not already there.
- Click the Add Item button.
- Fill out the form. The shipping price is per-item, and is added onto the store's base shipping rate.
Once an item has been added, you can add photos to it:
- Go to the item's web page by clicking on it in the store.
- Click the Photos button.
- Click Select Images and choose images to upload.
- You can navigate back to the store through the breadcrumbs, or go to the gallery to choose an image to feature.
By default, the store won't be accessible to anyone without the direct address. You can either go to the store and click the Add to Linkbar item of the This Page menu, or add the special widget for a given store to any page on your site.
The easiest way to accept donations on your website is with the "Donations" widget, available in the "Community" widget folder. You can add this widget to any page, supply your PayPal email address, and you'll be up and running.
You can also use the store to ask for donations from your visitors if you wish. Just add an item to the store, but rather than giving it a price, set the price to zero. This will give the user the option to enter a price themselves.
You'll be best off using it as a fund for a specific purpose. Specifically saying that donations accepted online will go towards a specific purpose should help to increase the amount given.
Sometimes, an item in your store will need to have options - for instance, a T-shirt might have options for size. To add options, go to a store, click on the title of the item you want to edit, and click the "Options" button on the page that comes up. Each of your items have a default option, which is not shown to the user if that's the only one. If you add more than one option, it will show up when the user adds a product to the cart.
By default, PayPal will email you directly when an order has been placed, but your website won't have any indication that an order was processed. You can use PayPal's IPN (instant payment notification) feature to set up a link between your website and PayPal. This will keep a list of orders, along with their status. Here's how to set this up:
- Log onto your PayPal account.
- Go to the My Account tab, then click on Profile.
- Click on the My Selling Tools box on the left side.
- Click "Update" next to the "Instant Payment Notifications Preferences" section.
- Go to the "Choose IPN Settings" area.
-
Under the "Notification URL" area, type:
Change "IPN Messages" to enabled.http://[YOUR DOMAIN NAME]/mod/store/paypal-ipn.php
Once this has been set up, future orders will be logged. You can go to the Orders button on the store page to see these. The current payment status is noted (whether you've received the funds), as well as your shipping status, which you can use to track who you've sent the goods to.
Helpful Ideas
This is a common request from churches - they have an existing newsletter that they print on paper monthly, and they'd like to also publish it online. This is a great job for the news module, which allows you to post articles with a starting and ending date. They'll show up on your front page only between these dates, and will then be moved to the archive. Another feature of news is the ability to add file attachments, which is a great way to publish your newsletter.
To start, make sure you're logged on as an administrator, and you'll see an Edit button next to the "News" box on your front page. Click that, and then click the "Add News" link. Add a title for this edition of your newsletter, and set the start and end dates to your liking, usually a month. In the "Summary" field, type an abstract of this edition.
At this point, you have three options: to paste the text of the newsletter into the "News Text" field, or to attach the original newsletter document as a file, or convert to PDF.
If you'd like to paste the contents (recommended for easiest reading), simply select all of the newsletter text from the original document, select Copy (probably in the Edit menu), then move back to your web browser window. Place the cursor in the "News Text" box, and use your browser's Paste command. The text will appear in the box. Note that your images will not show up, and the formatting may look different, however, users can read the content directly rather than having to load a file and make sure they're able to view the file.
When getting your church online, you will be sharing a lot of information about your church with the world. You must take care in doing this that you don't share too much information about your members. Here are some tips for protecting the privacy of your users and to keep your website free of bad guys:
- Don't publish your member directory online. This is an important guideline. Many churches want to publish their members' addresses and other contact information because it seems like a logical step on the path of what they've always done, but this is very dangerous. It's impossible to publish this information without opening your users up to dangerous people online searching for information about them.
- Use care in photo galleries. The world can see your photo galleries. Never use full names of the people in the photos, and consider not sharing names at all, especially in the case of children. In their case, it's best to first get parental permission to post photos.
- Don't post email addresses. When posting text for news entries and such, don't share email addresses in these. Plain text email addresses will get harvested by spammers and will be sent unsolicited email. The email addresses in profiles are safe, because only logged-on users will be able to see these.
- Consider requiring validation for accounts. By default, anyone can create an account on your website. This is usually a good thing, as it increases particpation, but if you run into problems, you may wish to validate accounts before they can be used. You can set this up under the "Preferences" item of the "Layout" menu.
- Consider requiring accounts to post messages. By default, anonymous users to your website can post messages in your discussion forums. Again, this is a good thing because you'll get a lot more posts, but if you run into problems, you can lock this down. This is also under "Preferences", and is effective especially with the account validation.
- Don't be too liberal with admin rights. You can appoint various users on your site to be administrators over various parts, or the whole. Be sure that the person can be trusted before doing this, especially in the case of global administrative rights. A person can easily do damage to the site, whether maliciously, or unintentionally (if they're not good with computers).
If you're looking for a personal way to communicate with your visitors, try out our Blog feature (from the Blogs item of your site's Users menu). Also known as weblogs or online journals/diaries, this is a great way to informally keep others up to date with what's going on.
Here are some things you should know about our blogs:
- Each blog post has a start date associated with it. If this date is set to the future, it will not show up until the day you specify.
- A blog entry can be either set to "Active" or "Pending". Pending entries will not show to the public until you activate them. This is a handy way to save entry ideas for a "rainy day", or to save a partial entry to finish later.
- Topics can be created to tag your content. For instance, you could create topics for "Personal", "Music", "Events", etc. Each post can have multiple topics, and users can filter based on topic.
- When adding an entry, you can post an image. This image will show as a thumbnail in the top-right of your post. You can click the image to reveal the whole image.
- If you have a long post, consider keeping the "Main Post" section short, and adding the rest in the "Read More" section. This will keep your main blog page shorter.
- Each user can have multiple blogs, and each blog can have multiple owners. Admin rights are not normally required to create a blog. To disable non-admin blogs, click the "Disable User Blogs" button in the Preferences item of your site's Layout menu.
- The blogging code is shared with the news code. By editing the category, you can turn a news category into a blog, and vice versa.
Now that your church is online, the next step is getting people to use your website. You'll get two types of visitors: members of your church who want to see upcoming events, and community members who are looking for churches. You'll reach these two groups separately, so let's look at each of them.
Members of Your Church
The first group that you'll want to attract are the members of your church. They will be the majority of your traffic, and can make your site a very vibrant and fun place if you get them started. Here are some ways to promote your website to your church members:
- Give them fresh content to return for. Every week, update your upcoming news, events, etc. This is the most important thing you can do to have a popular site! A stale site gives your members no reason to return.
- When you're first launching your website, consider sending letters to your members.
- Announce your site to your members. Remind them weekly to visit.
- Facilitate community. Add groups to your website, and encourage your users to create accounts and chat on the "Forums" portion of your site.
- Create accounts for your members. Use the "Account Creator" on your administrator menu.
- Use your website address everywhere! Stationary, newsletters, advertisements, inside and outside your building, and anywhere else you can think of.
Remember that it may take awhile before your site community reaches a "critical mass". At first, only the braver users will post messages. As things become more active, more people will feel comfortable with participating. Encourage discussion by setting an example and reminding people to talk!
Members of Your Community
When people move into the area, or otherwise decide that they need to find a church to attend, make sure that your website is there for them! One very important thing to remember is that your site will not automatically show up in search results. You must submit it to a given search engine in order to be listed.
While the hints above also apply, some different ideas apply here:
- Submit your site to as many search engines as possible, especially Google. Your site may eventually get found through links to it, but this could take months or years, and you can speed this up immensely by submitting them yourself.
- If you'd rather not go through the process of search engine submission yourself, we can add your site to dozens of search engines and local church lists for you. See our upgrade information for details.
- Encourage other relevant sites to link to you. This improves your search engine ranking. Local churches, sites for your denomination, and other local websites may be happy to link to your site.
- Use Google to find the local online church lists for your area. Make sure your website is added to these.
- Encourage your members to post messages on your site. When a new prospective member visits your website and sees how friendly your members are, they'll join for sure.
-
Your site should have a domain name. Instead of
xyzsite.thischurch.org, you can bexyzsite.com, which will help with name recognition. See the "Domain/Email" item of your "Features" menu to set one up.
Podcasts are a hot topic on the internet these days, but few people really know what they are or how to create them. Long story short, Podcasts are like online radio shows that anyone can create. It's typically very hard from a technology standpoint to create a podcast, but we make it possible for any intermediate user to create one.
First, a quick background in the theory. An RSS feed is a computer-readable file that contains updates from a certain area of your website. Your users can subscribe to these RSS feeds using a syndicator program, and they'll then be notified when you post new items to that area of your site. A podcast is nothing more than a special RSS feed that contains MP3 files.
Every news category on your site has its own RSS feed. To podcast, here's all you'll need to do:
- Create a news category. You can go to your website homepage as an administrator, and add /mod/news/ to the end of the URL. From there, click the "Add Category" and use "Blog Style" as the format.
- Create an episode. This is the main challenge. You need to think of something to say, and you need to find a way to record it. While we don't provide support with this step, we've heard good things about Audacity, a free sound editor. You can use a lower encoding quality than you'd use with music for voice to save space and bandwidth.
- Add a news item to your news category. Title it "Episode 1" or something similar, and tell a little about it in the news text.
- Add the MP3 file as an attachment to the article. Give it any title, this part doesn't matter. Be patient, it will take awhile to upload.
- Share your podcast with others! From the news category's list page, notice the "Notify Me Of New Articles" box at the bottom. Click the "By RSS" link. Take the URL of this page - this is what you publish as your podcast feed URL.
Note that it's possible to post non-MP3 items to your podcast feeds. These will be ignored by podcast syndicators.
 Please be patient, this will take a few seconds.